Wednesday, December 30, 2009

My week at home... so far

We came back early from Christmas break for work and to spend my remaining vacation days- in my new revamped studio that is in our new living room (pictures to come of our apt redo once we have fully unpacked!) Despite being woken up by my our neighbors down stairs arguing and yelling f*** at 6:30 in the morning EVERY MORNING, this week as been very relaxing and productive!
Here are some pics!
I am working hard on my Grayday shop this week. Making pillows and painting little containers to list at the beginning of January. These crocheted pillows have been a big trend, so I have repurposed some vintage blankets for the task! Here's the first pillow of 3 in this warm wool genre.
Yesterday Cam went to the local Fish market and bought some haddock and then cooked it up with rice and a frozen medley of veg! Very good and the perfect mid day lunch!

I've been making more of our long loopy necklaces for our Urban Knitfit's etsy shop. I've perfected how to make them with a few little tricks, allowing me to make more in less time!

Some upcoming posts to keep an eye out for: Netflix Queue review, Apartment before and after, New Year's resolutions.... etc

Tuesday, December 29, 2009

Player Piano and a little Christmas song!

On Christmas Day, Liam and Sophie played the Player Piano and sung along.

Getting big when you can reach the pedals and read the words!

Monday, December 28, 2009

Urban Knitfits ON the Uniform Project!

We Donated two of our funky Braided necklaces to The Uniform Project and here they are!
In case you haven't heard- the Uniform Project is the idea of wearing one dress for one year- to raise awareness of sustainable fashion and to raise money for the Akanksha Foundation- that benefits school children in India! Learn more about the UP Here.

funny sites and blogs

Here are a smattering of some funny sites to waste some time on! or turn you into an expat.

Eternalmoonwalk
Thisiswhyyourefat
peopleofwalmart
sketchysantas
autocompleteme
lookatthisf***inghipster
mymomthestyleicon

Thursday, December 24, 2009

A Christmas Eve Montage


My Mom always does it up for Christmas, and this year is no exception. Here's a montage of little traditions at my folks house on this Christmas Eve Morning.

The tree looks almost a blaze as if it belongs to Clark Griswold!

The stockings are hung...
The crackers are waiting....
And little dog is sleeping, well attempting to, she's debating!

Happy Holidays to Everyone and Merry Christmas! Stay tuned because if you're lucky there might be a player piano video posted in the next few days! (ps the heat is fixed!)

Wednesday, December 23, 2009

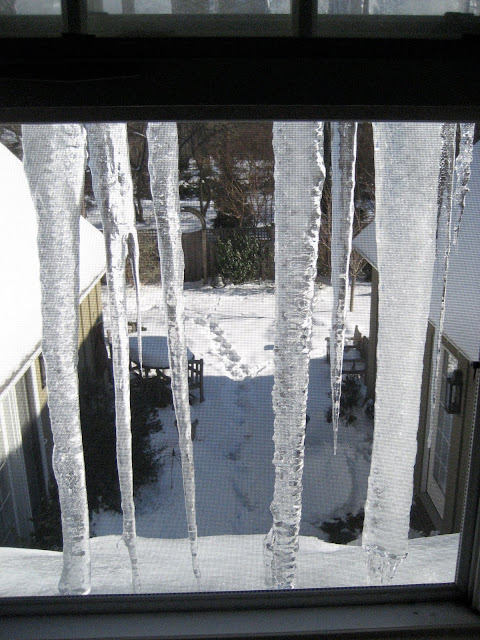
Ice prison


The heat is broken in my parent's house today- so that coupled with the melting after our snow storm- makes for some interesting metaphors- sort of like living in an ice prison ! (click on this picture to see the detail in the ice! It reaches and connects to the snow/ice on the roof!)

Tuesday, December 22, 2009

snow gear!


We had a big snow storm at the beginning of December that led to a snow day! So we dressed up our dog in all of her snow gear and headed out on a big walk. Here she is above looking thrilled, this emotion pretty much stayed with her the entire time. And in case you missed it- here is the video of Millie trying on her booties a few days before the storm!

Millie actually really liked her hat (from beantownhandmade) and her sweater, by me and her boots from Planet Dog!

For your neck- by Urban Knitfits

We've listed some fun new knit pieces to our etsy shop this week!

Reversible Pomegranate Cowl neck!

Shredded black cowl neck, and versatile hat!

Oceanic wool and shell necklace.

Funky Pink Rope wool necklace.

And our favorite- an Urban Knitfits inspired Red and turquoise with pink and white, wool necklace! Check out our Etsy shop for more details plus a new Men's hat!

Monday, December 21, 2009

Fantastic Pancakes!


The Perfect snowy winter morning calls for a nice cup of tea and some warm pancakes!

The Husband has been making these of late and they are GOOOOooood! Sometimes they can be a nice thin crepe, depending on the ratio of some ingredients. (leave your inhibitions and diet consciousness at the door, these are worth it)

Here's the recipe:
2 cups of flour
2 tblsp of sugar
4 tsp of baking powder
1 tsp of baking soda
1 tsp of fine salt

Combine these in their own bowl.

2 cups of buttermilk (or substitute- 2 cups milk, 1 tbl apple cider vinegar)
4 tblsp of melted butter
1 tsp of vanilla extract
2 beaten eggs

combine the wet ingredients in with the dry and whisk!
Fry in a pan with butter then top with REAL Maple syrup and butter and if you really want to gild the Lilly- maybe top with Jam! After all they are crepe-like, so do it up! We have had these for leftovers for Lunch or dinner with cheese and a bowl of soup, rich but oh so good!

Enjoy!


Wednesday, December 16, 2009

Grad school, A look back Part 2: "Underneath"

The second part in my grad school retrospective series, a series in anticipation of my website make over.

This was a sculpture I made during my second year in Grad school. It's called "underneath" and to sum it up, it's basically the life or world a child creates in abandoned places.... a child's need to carve out a niche for themselve for play and imagination. This was in response to my first Installation "The Room" it's a piggy back on that... I hope to elaborate on this idea in the future.


Tuesday, December 15, 2009

What color should I paint my new shelf?

We recently re arranged our entire apt- post of before and after pics coming soon. The main reason we switched our bedroom with our living room was to allow for a larger studio and knitting area for my work. As a result I acquired this new shelf. It needs a little TLC... and some PAINT! So what color should I paint it?

Here are the colors in our living room... and honestly I am open to any color! Especially since this shelf will reside in many different rooms as we continue to move until we settle in a house...
Here are some paint chips. They don't translate accurately in this photo. But we are thinking turquoise, emerald green, deep pink, or red.... what's your opinion? At the moment we are leaning to Red!

weekend craft fairs- check!

A big thank you to all who came out and saw us this past weekend at the two craft fairs we were in! It was our maiden voyage out into the community, we were successful and are gearing up for future fairs. We'll keep you posted!

Wednesday, December 9, 2009

My Work At Corduroy- here's the link

I have three pieces in a show this month. Here is the site- where you can buy the work and other cool things from the shop. My pieces are "Place", "Beautiful Hands are Those That Do", and "Ocean Floor" (which is new). All work is framed, and the two prints are matted... Here's the link!

Tuesday, December 8, 2009

Baby got a brand new pair of Boots!


Millie doesn't like walking with us in the snow, she loves chasing snow balls we make but hops around due to her cold little feet! Plus Cam doesn't like the idea of all the chemicals and salt on the sidewalks irritating her feet either.
So here is the first trial run! Not a huge success, but FUNNY! I think she will appreciate them tomorrow during our next big snow storm!

I'll try and take video of the whole ensemble - including booties sweater, and if Cameron and Millie let me- her hat!

Thursday, December 3, 2009

Grad school- a look back part 1: the Room


In an effort to accurately market myself as an artist, and in the meantime while I work on my new website overhaul, I thought I would start to post images of the installations I built during grad school. This is all towards the bigger goal of being a full time artist next year... so here goes.
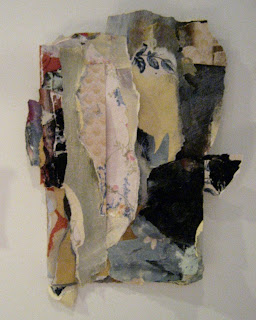
First Installation "The Room"- was a reaction to change, to family lose, etc. Originally I had been working with layering and collaging wallpaper on a small 6x8 inch scale (see image above). But soon I felt the need to go bigger and to actually create a large wall to gather these sections from in order to acquire more authentic remnants, etc. But soon the wall called for a room.

First I walled off about 9 by 3 ft of the end of my studio with Drywall and a $5 door I bought from the return dept at Lowes. I aged the door myself and the door knob was donated.

(I apologize for poor camera and photo quality, this installation was difficult to capture. but click on some of the clearer images to see them more in detail.)

This is what you see once the door is open. There were two palletts placed on the floor to mimic floorboards. And behind the palletts and the wallpaper were strung lights. The wallpaper was made in long big sheets attached to the wall, then removed and hung about 4 inches away from the wall to allow the lights installment behind them. There was a very musty, dusty smell... It was interesting to see how people approached this space with their own associations. Ultimately as the creator, I had to just let these associations happen and seek solace in my own associations. Because after all, looking back, I built this for myself in many ways.


The whole lighting system was hooked up to this awesome home made timer my uncle built for me in exchange for a few pies! So the whole system was on a rotation. When the lights came on behind the walls and beneath the floors a mixed audio track from home movies and music played as you were surrounded by this glow coming from behind the walls. The holes in the history of the wallpaper were often celestial little pin pricks mixed with larger areas of thin paper resulting in a pinky glow. (I took video of this process which I will edit and include on my new website.)

After 30 secs the timer would rotate turing off the audio and hidden lights and replacing it with the single filament light bulb. Allowing the viewer to look around, read some text scribbled on the wall and take in the many many layers of wall paper, paint and plaster. And then the timer would flip and out would go the light and on would come the audio and hidden light.

Here is the timer in the corner of the installation.

There is much to say about this, hence my grad thesis, but this will do for now...

I saved a few big sections form this project, and plan to hang them in my house one day.

I will be adding other posts of two or three more installations I made during 2006-2008, so check back often.

Tuesday, December 1, 2009

Happy December- time for a 2010 calendar

It's that time of year to start shopping for a new calendar! This year I want to support my fellow artist's and crafters- and buy a 2010 calendar either on etsy or at one of the craft fairs I am participating in. Here are just a few I found on etsy today. I hope they inspire you to support artists and start your own search for something truly unique. Calendars also make great gifts!
Ourlittlelovenest's 2010 wall calendar!

pinkroses'1220 12 month calendar in pdf format, you print it!

LeahDuncan's 12 month small calendar.

Curiousdoodle's- 2010 desk calendar

Monday, November 30, 2009

First Friday- I'm IN!

I love First Fridays in Portland, Maine! They are a great night where everyone comes out, visits and enjoys the art scene. I am participating this month in a group show at Corduroy, where I have two large prints and two gouache paintings. Above is the flyer, click on it to read it more clearly. Hope to see you there!

Tuesday, November 24, 2009

Tis the Season for... PIES! (A repost)

I decided to repost this from last Thanksgiving- to offer our family pie recipe! Enjoy!


My Mother is the queen of pie making hence why at every birthday and at our wedding reception I asked for Pies please!

With her recipe you will be making delicious pies too! The recipes are SOO easy!

HERE GOES!

Pie crust:

1 crust- ie just a bottom crust for a pumpkin pie

1 and a 1/3 cup of flour
1/2 tsp of salt
3 Table spoons of cold milk
1/3 cup of Wesson oil/ veg oil
1/4 cup of sugar


2 crusts- ie top and bottom- for an apple pie

2 Cups of flour
1 tsp of salt
1/4 cup of milk
1/2 cup of vegetable oil
1/4 cup of sugar

HOW TO!

Measure out your oil in a measuring cup then add the milk to the measuring cup- DO NOT STIR

In a separate bowl combine the dry ingredients- the flour and salt. ADD the liquid to the flour mixture and mix with a fork. Here comes the improvisation- if the mixture is too dry and not sticking together then add a touch a milk until it begins to look like dough. Sometimes you will need to do this and other times you wont! Its part of cooking!

Then wet the counter and lay one layer of wax paper down (the dampness allows the paper to stick and not move).

Then put your dough on the paper and layer another piece of wax paper over top. Then roll it out with your rolling pin. Be sure to change directions to get an even circle and not an oval!

Then take the top piece of paper off and scoop your hand underneath the paper with the dough on it and flip it over into the pie pan and remove the wax paper.

If you are baking just one pie crust for a pie whose contents you don't have to bake- ie a French silk chocolate pie- then you will stab holes in the crust with a fork- to avoid any air bubbles being created btwn the dough and the pan. You will cook it at 500 for 5-7 mins.

APPLE PIE recipe- (what to put between your pie crust!)


NOTE when making an apple pie you will prep the apples before making the crust- because since this is an easy pie crust recipe it doesn't keep like the standard old fashion crusts do- and you will need to cook this one right away.

Peel and core 6-8 apples
Put them in a bowl and squeeze a lemon over them to prevent them from browning.

In a separate bowl mix sugar 1/4- 1/3 cup of brown sugar and the same of white sugar. 1/2 tsp of cinnamon and a 1/4 tsp of nutmeg and a pinch of salt AND mix!

ASSEMBLE the crust and place the bottom crust in the pan and then layer the apples into the crust.

After the first layer of apples- you will sprinkle on a layer of the sugar mixture. You will repeat the altering layers until you have reached the edge of the pie crust. I usually over layer because the apples cook down a bit and you want your pie to have some apples in it!

The last layer will be the sugar layer.
Then cut 2 Table spoons of butter and put it on top of the apples.

Put the top crust on and pinch around the edges of the crust- sealing the two crusts together.

Cut 4 holes in the top crust as a vent to let the pie breath when being cooked. THEN sprinkle a little bit of white sugar on the top of the crust.

COOK!

Preheat the oven at 425- you will cook the pie at this temp for 15 mins
THEN turn the temp down to 350 and cook the pie for an additional 30 mins.

The pie will be done when the edges are golden brown and there is a nice bubbly over flow around the edges!

EAT UP!

Black Friday shopping suggestions- online of course

Many people will be hitting the net this weekend to get a crack at some holiday shopping, although I am not one of them (i'll be selling though ;) )- I have some fun suggestions for new sites I've come across... maybe a wish list is in order?


Need Supply, modcloth, pixie market, abigailpercyJewelry, harvestgoldgallery, luckymebeads, Littlehousesclothing, isphotography, bluebellbazaar, blacksheepheap, moxieandoliver, marcig's, macslaps, prettysneaky

that's it for now!

Oh and free shipping at Urban Knitifits this black friday weekend!

Sunday, November 22, 2009

Craft Fair Prep

Here is our Banner for our Craft fair booth! And since we have two fairs coming up in Dec, we thought this weekend would be the perfect time to get cracking! I had some leftover canvas and I zig-zagged the edge with red thread, and then Les cut out "Urban" from gray felt, glued it in place while I stitched "knitfits" by hand with this fun blue yarn. Then Les outlined the city skyline and we painted it with black fabric paint. Then I cut a bird shape out of an old red vintage sweater that was in my "sewing" box. And poof our bird! Just like our Etsy shop banner!

Now we just have to have grommets placed in all four corners. Below the banner is one of the three aprons I made. I copied an industrial apron for size and pocket ideas. I made them out of this striped kaki fabric, attached some ribbon, then used the same fabric ink to paint on the letters- Urban with stencils and knitfits free hand. There are three pockets, two large- for all the Scrillah we'll be bringing in, and one slender and shorter pocket in the middle for pens.

Here's a detail of the banner. Once the bird dries (adhered with fabric glue) I will go around the edges with a zigzag red stitch for extra reinforcement and to ensure the knit sweater remnant wont fray. I might also stitch around the word "Urban" with black thread. (From a distance it doesn't read as felt, but rather paint... and we wanted a few different textures on our banner while keeping it simple and graphic.) If you've been to craft fairs you know that a banner is kind of important and the more unique and fun- the more eye catching and as a result- more visitors to your booth!

Thursday, November 19, 2009

How to make over a dress form, in case you were wondering!

In Prep for our Urban Knitfits Craft shows, I wanted a dress form for our booth- something that would act as a display and as an element that would transform our booth into a shop.
So I posted an ad on craigslist and the above dress form is the result. I knew that an authentic vintage form would run me $150+++ So I settled for this $40 one and I decided I would transform it myself. Here's a how to! (in case you ever find yourself in the same situation!)

I had a bunch of Canvas fabric around from a pillow project, so I dyed it in our tub with loads of generic tea bags. (I took pictures of the process and I might use these images in an art project down the road.)
I felt that the leg definition- or crotch, was a lot of things- unauthentic to the vintage version, visually distracting as a result and too mall mannequin. So I used some epoxy glue and adhered cardboard to the form.
Once the fabric was dry and ironed, I sewed seems and darts along the larger pieces with my machine, before using some sturdy fabric glue to ultimately glue it in place. Originally I planned on hand sewing the canvas to the form but soon realized I was insane and with some helpful motherly advice, I bought some fabric glue. -Above- is a picture of how I would glue the fabric and then keep it in place by pining it to the form until it dried.


Here is the final picture. I still have one or two things left to do- for example, I might take some sand paper to a few edges and fray the fabric as well as take fabric paint and stencils and add letters and numbers along the neck- to mimic the vintage forms. I decided not to put the wooden top back on, since even if I aged it, it still wouldn't look authentic. I'm not too jazzed about seeing the cardboard so clearly through the fabric, but ultimately I think it's fine. It's finally done to the point that we have been using it for pictures for our etsy shop and we might hang or write "Urban Knitfits" on it to act as another sign for our booth, as well as necklaces or scarves. We are making our banner for our booth this sat, I'll post pics once that's done!

LinkWithin

Related Posts Plugin for WordPress, Blogger...